Saturday, 27 March 2010

Building a Fly Rod - Part 4 Preparing the Cork Handle

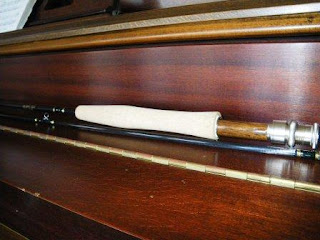
I am using a pre-made handle. This is a half-well handle and very comfortable for light rods.

Handles are made by forming a blank of glued cork rings. The rings are stacked to the length desired, clamped until the glue has cured and then the cork blank is turned in a lathe. It is not so much cut as sanded into shape. That is messy, fussy work and without a lathe I'm not quite sure how one would manage to make one.


The handle I have has to be fitted to the rod blank and the up-locking part of the reel seat needs to be counter sunk into it. This is for looks as well as a good firm mounting of the reel.

To fit the handle it is slid over the rod blank from the top and down toward the butt until it binds. A few strokes of a rat tail file and repeat the fitting. This is called reaming the handle and continues until the cork handle will slide into place but no farther.

Again the blank is marked so that you can rough up just the parts that won't be seen. Then it is ready for gluing.

A good handle fits so that it won't squeeze all of the glue out when it is slid into place but can't slide farther down the blank than it should. Tricky but all it takes is patience. Doing the fitting by hand is much more likely to end well than using power tools like a Dremel or rigging something up with a drill.

This is what it looks like fitted to the blank with the reel seat mounted.

Labels: , ,

Building a Fly Rod - Part 3 Attaching the Reel Seat to the Blank

Now that the reel seat is glued up and cured it is time to prepare the blank. A blank will usually be much smaller than the hole drilled through the reel seat so you need to fill that gap to keep the reel seat centered on the blank while the epoxy cures.

Step one is to carefully mark the blank so that you know how much of it will be covered by the reel seat. Using a fine sandpaper the part of the blank that will be hidden is roughed up so that the glue will have good contact with the surface.

After wiping the blank clean of skin oils and dust a couple of mandrels are formed using masking tape. These are just to keep the blank centred in the reel seat and are not an important structural component. It is the epoxy glue that will do the work.

It is wise to do one more dry assembly before mixing the epoxy just to make sure everything is going to end up where you expect it to and its ready for the glue.

Remember if the reel seat has a cut out for the reel foot it must be lined up with the spline markings along which you will be wrapping the guides.

Labels: , ,

Saturday, 20 March 2010

Building a Fly Rod - Part 2 Assembling the Reel Seat

With the splining of the rod done and the blank well marked it is time to assemble the reel seat.
The seat I am using on this rod came in five pieces, six if you count the tightening nut.

Make sure you completely understand how it goes together before getting out the epoxy. Practise a few times and make note of the order in which the pieces need to be put in place. Also make special note of what goes on from the front and what goes on from the back. You only get one shot at this.


When you are ready prepare the wood insert by lightly sanding only the parts that will be glued. Don't get careless- sand only the parts that will be hidden by hardware. Using a bit of emery paper or fine sandpaper also rough up the metal parts that will be in contact with the epoxy. Remember - only the parts that are hidden should be scuffed up.

Mixing the epoxy for finally gluing the reel seat together is another of those simple things that must be done perfectly to ensure success.


 Epoxy is a co-polymer, which just means made of two chemicals. The two parts are called the hardener and the resin. In consumer applications these two parts are mixed together in equal proportions.

In practise I use a piece of tinfoil wrapped around a bit of cardboard as a mixing surface. Plastic coffee stir-sticks work well as a mixing tool and also double as great applicators for epoxy.

You can use syringes to ensure accurate measurement of the amounts to mix or you can pour out a drop of each chemical to about the size of a quarter. Both will work but accuracy is always better if you have the option. 
Mix the components together gently for about two minutes. When the mixture is of a smooth even colour it is ready for use. A little goes a long way so be conservative when you apply it. It creates a very strong bond and the waterproof varieties are excellent for all rod building applications.

Epoxy is very difficult to clean up after it has cured. Be cautious about touching anything if you might have epoxy on your hands from the mixing or application process. I keep a few rags handy and wipe my hands carefully after every process from mixing to gluing.

Here is a good tip - plain white vinegar works well to clean up epoxy while you are working with it, even if the epoxy is starting to set and gets a bit sticky, vinegar will work.

Acetone is another thing that works very well but be careful about using it around the wooden part of your reel seat as it will ruin the finish. Acetone fumes are very unpleasant so be careful.

The best way to keep the wood looking great is to not get any epoxy where you don't want it.

Oh yeah, stick to the formula - 1:1 hardener to resin. More hardener won't make the epoxy harder. It will make it sticky and never able to set up or cure. Then you will have a real mess that is almost impossible to clean up and end up throwing away a $50.00 reel seat.

All that being said, my reel seat went together well and next time its Part 3-Attaching the Reel Seat to the Blank.

Labels: , , , , , ,

Sunday, 14 March 2010

Building a Fly Rod - Part 1 Getting Started

Building a Fly Rod is a great project to get one through the last few gasps of winter.  I decided to put together a rod custom made for the conditions encountered here in Nova Scotia while chasing Trout and Smallmouth Bass. A good rod should also be able to handle the odd Shad fishing trip or even a salmon if one should be so lucky.

For day in, day out fishing around here I think an 8'6" - 5 wt. with a nice quick action is just about the perfect tool for the job.


After weeks of pouring over catalogues and websites I've gathered the parts and am ready for the build.

The first step in actually building a rod from scratch is to look over your blanks, the rod without anything added, and determine where the spine or spline of the graphite shaft is. As blanks have become better this step is often neglected as being "old school" and no longer necessary but it is a simple thing to do. It won't cause any harm and may just identify that sweet spot that makes your rod better than an identical one that has not been tuned or dialed in.

To my mind splining the rod is the most important part of the process. It tells you which way the rod wants to bend and as importantly which direction it will resist bending. That information determines the placement of the rod seat if it has a mitered recess for the reel foot. It determines on which side of the blank rod your line guides will be placed and ultimately, the feel of the whole rod.

You determine the spline or spine by holding the blank in a slightly curved position, the butt end on a smooth, flat surface. One hand holds the blank bent while the other gently rolls it across the the flat surface. As it rotates you will feel a definite jump as it settles into it's preferred curve.

Truthfully, it is a bit of a cross between using a dowsing rod and a Ouija Board as far as the sensation of splining a blank goes. Some people get it easily, others not so much.

Having determined the spline I marked the inside of the arc for the guide side. Some people choose to mount their guides on the opposite side if they want a softer loading but stiffer playing action. Some people say it doesn't matter. I suspect that if the subtlety of the difference eludes the end user anyway then it really doesn't matter.

Marking the blank originally I just wrap a bit of masking tape around the blank in three or four places and using a pencil make a guide mark. That is the blue tape on the blank you see in the pictures. When it comes time to fit components I use a China Marker to draw directly on the blank and remove the tape. That is because the tolerances of sliding on the reel seat and fitting the cork handle are too tight to allow for wraps of tape.


Next time-Building a Fly Rod- Part 2 Assembling the Reel Seat

Labels: , , ,

Saturday, 13 March 2010

First Post at New Domain


Well, looks like the migration may have worked. I've posted this picture of our Springer when he was a puppy. Gosh that was only 3 months ago. He is already about 40 pounds and was neutered this past Monday. Poor guy, I still can't look him in the eye. It will however make his life much easier and ours too.

As I mentioned the 5wt rod is finished and I had it out in the yard this morning to look it over in the sunlight.  Not too bad if I do say so myself but like most things there are some bits I will do differently next time. I can't wait to get started on another.

Labels: , ,

This blog has moved


This blog is now located at http://stevedobsonsfishermansblog.blogspot.com/.
You will be automatically redirected in 30 seconds, or you may click here.

For feed subscribers, please update your feed subscriptions to
http://stevedobsonsfishermansblog.blogspot.com/feeds/posts/default.

Blogger FTP Migration Issue

I have finished the rod I started building the other day and have taken lots of photos of the process. I will do some posts over the next little while on how-to build a rod but first I have to deal with this Blogger FTP migration issue. Steve Dobson's Fisherman's Blog is published via FTP and Blogger soon will no longer support FTP publication.
-
-
The existing pages and new posts will need to migrate to either a new custom domain or to a blogger.com address. The old urls will be redirected to the new Blogspot location. With luck this will be seamless to readers.
-
I will start the migration today but who knows, this may be the last post on this blog? If I get lost in cyber-space please send a search a party. If it all works, look for a post on getting started building a 5wt fly rod.

Labels: , ,

Sunday, 7 March 2010

Building a Fishing Rod

A hand built rod by Steve Dobson
There is something about building a fishing rod. There is a sense of rightness about it as if I've grown into it.

As if this is a logical progression from tying a string to a stick as a child and trying to catch perch.

 I think about that progression as I prepare my work area and start to unpack the parcel containing all of  the bits and pieces that will become a five weight, graphite fly rod.


Handling the blanks I remember my first trout from the Meadow Pond and recall a trip with Dad and my brothers in the old green boat, all of us armed with worm and bobber.

 I remember vividly, a porpoising rise to my first crudely tied fly by a Rainbow Trout. He leaped clear of the crystalline headwaters of Mission Creek up on Big White Mountain.

That brings to mind my first somersaulting grilse careening down a pool on Grandy's Brook and the sullen sulk of a twenty pound Atlantic Salmon not so long ago here in Nova Scotia.

All of those memories and the new adventures waiting imbue these bits of wood and steel and graphite with all of the potential to realize a fisherman's fondest dreams.

Over the next few weeks I'll show you the steps in building a fishing rod and let you know how I am progressing.


Labels: , ,